piCture pOlish - Blog/Insta Fest 2014 !
Aujourd'hui, alors que j'écris ce billet à la fois excitée et pleine d'appréhension, je n'réalise toujours pas.
Je n'réalise toujours pas comment il est possible que mes ongles et moi-même aient pu être sélectionnés pour cette fête mondiale qu'est le Blog/Insta Fest 2014, organisé par Picture Polish. L'an dernier, je n'ai même pas vu passer l'annonce des sélections - ramasse un jour, ramasse toujours - et je m'en suis mordue les doigts. Cette année, à grands coups de "qui n'tente rien... ne tente rien", j'ai envoyé timidement ma demande aux nanas de Picture Polish.
Réponse positive. Sé-lec-tio-nnée.
Syncope. Hyper-ventilation. Petits cris stridents.
Je suis donc OVER fière.
Et OVER inquiète aussi, hein.
Biiiiiiiiiiien.
Qui dit nouveau Blog/Insta Fest, dit nouveau déroulement des opérations. Cette année, tout se passe en 2 temps :
¤ une 1ère partie présentant un swatch d'une des teintes Picture Polish.
¤ une 2ème partie composée d'un nail art réalisé à l'aide de deux autres vernis Picture Polish... mais pas que ! Picture Polish se lance dans la vente d'un pack spécial de 4 planches de guides autocollants Nail Vinyls, chacune d'elle se composant de 4 motifs différents : chevrons, mini chevrons, lignes droites et angles droits. Pour l'occasion, chaque participante du Blog/Insta Fest 2014 devait utiliser un des 4 types d'autocollants pour la création du nail art !
On commence ?
Pour cette première partie du Blog/Insta Fest qui - je le rappelle - consiste à swatcher un des vernis Picture Polish, je me suis vue attribuer...
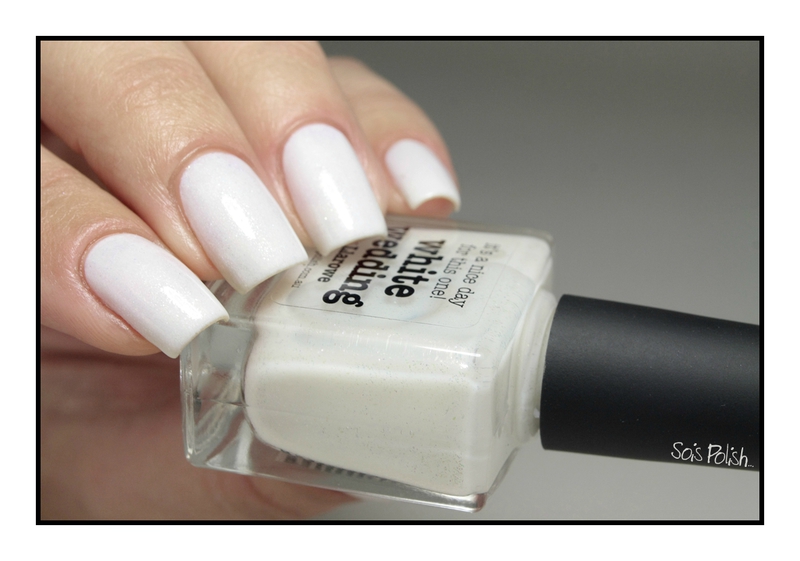
White Wedding !
Créé en 2012, en collaboration avec Leah Ann de l'e-shop Llarowe (qui ne connaît pas Llarowe...?), White Wedding est un blanc lacté, gorgé d'une muuuuultitude de petites particules multicolores. Moi qui n'porte quasiment jamais de blanc tout nu, j'ai adoré me promener gaiement avec White Wedding sur les ongles. Il est tout à fait charmant, lumineux à souhait, sans trop agresser la rétine non plus.
White Wedding !
Created in 2012, in collaboration with Leah Ann of the e-shop Llarowe (who doesn't know Llarowe…?), White Wedding is a milky white, gorged with a muuuuultitude of small multicoloured particles. I almost never wear a simple white polish, and yet I adored to wear White Wedding. It is completely charming, so bright & luminous, without attacking the retina too much either.
Côté application, on retrouve le parfait pinceau Picture Polish, c'est donc un véritable plaisir à poser ! Côté opacité, 4 fines couches ont été nécessaires pour cacher convenablement le bord libre... Ceci dit, le séchage est suffisamment rapide pour ne pas avoir l'impression d'y passer la journée :)
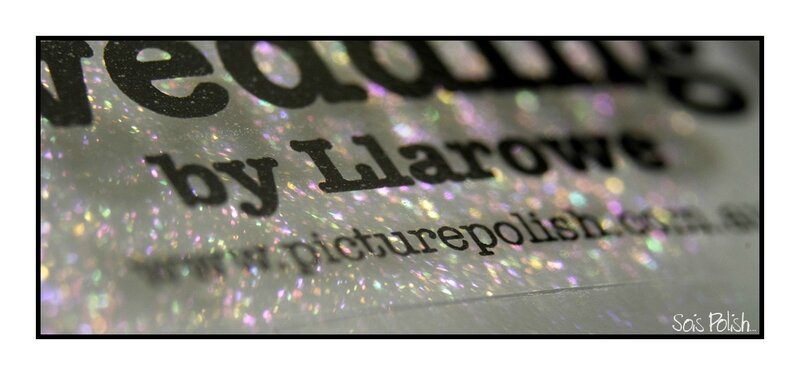
Alors comme ça, à première vue, les fameuses particules qui te donnent l'impression de crapahuter sur un arc-en-ciel ne sont pas super visibles, c'est vrai. Et pourtant, elles sont bel et bien présentes !
For application, we have the perfect brush made in Picture Polish, so it's a real pleasure to apply ! Concerning opacity, 4 fine coats were necessary to hide the free edge of the nail... Having said that, drying is enough fast not to have the impression to spend the day there :)
Then like that, at first sight, the famous particles which give you the impression of yomping on a rainbow are not really visible, it's true. And yet, they are present well and truly !
On passe à la suite...?!
Le nail art ! Le nail art ! Le nail art !
Quand j'ai appris quels seraient les 2 petits que j'allais devoir utiliser, j'ai quelque peu déchanté. Enfin... à moitié.
On va commencer côté vernish, on causera des guides Nail Vinyls plus longuement après ;)
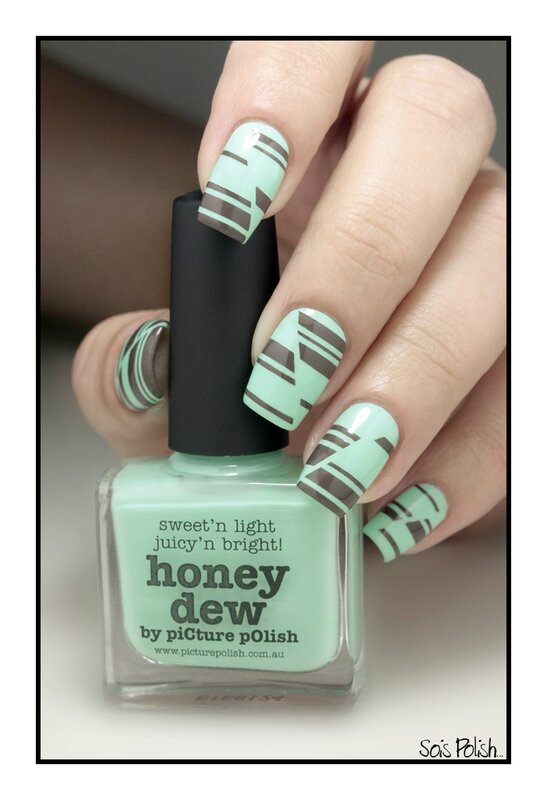
Avec Honeydew, j'ai failli pleurer de joie ! Créé en 2009 (Light Shades), ce vernis texture crème dévoile une couleur mint à la limite du néon. Frais, lumineux, il représente exactement ce que j'affectionne et porte le plus. Honeydew était d'ailleurs la seule nuance de mint qu'il me manquait chez Picture Polish... voilà qui est réglé :) Côté application, il s'est laissé dompté en 2 couches avec grand plaisir.
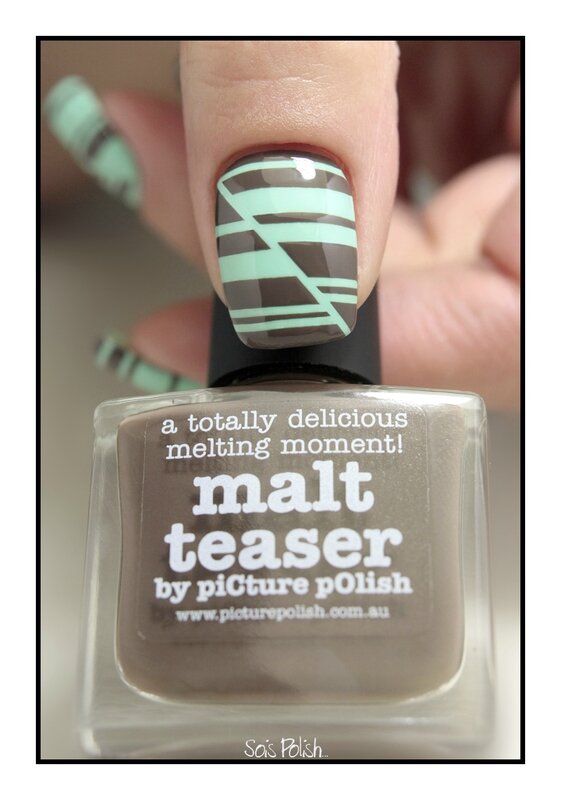
Avec Malt Teaser, j'ai failli pleurer aussi... mais pas de joie :) Le marron, c'est dur pour moi, très très dur. Surtout un marron crème a priori "basique", sans petites folies niveau texture. Lui aussi date de 2009 (Muted Shades), et lui aussi est un vernis crème. Niveau teinte, clairement j'ai pensé "chocolat au lait" en le voyant !
L'idée d'associer ces deux-là m'a d'abord arraché une vieille grimace, j'avoue.
Mais finalement...
... mais finalement, ça s'est plutôt bien passé entre eux !
Ce nail art n'a rien de très compliqué, et pourtant, je trouve qu'il en jette gravement.
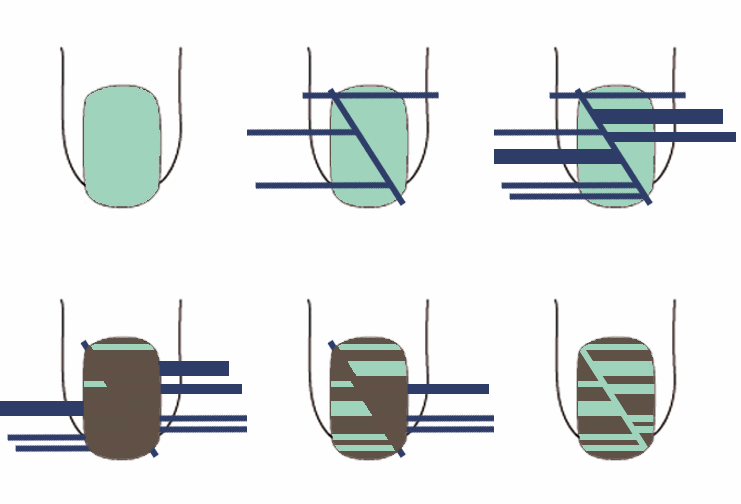
Pour le tuto, j'ai jeté mon dévolu sur poucien... regarde donc :)
¤ Après avoir posé ta base chouchou, tu appliques ton joli Honeydew - toile vierge du futur nail art - en 2 couches.
¤ Soit tu passes un coup de top coat accélérateur de séchage, soit tu attends sagement - et longuement - que ce soit parfaitement sec.
¤ Tu disposes tes guides autocollants Nail Vinyls, comme dans le tuto ci-dessus.
¤ Tu prends bien soin d'appuyer fermement sur les guides, surtout à la jonction entre l'ongle et la peau/cuticule, afin d'éviter les vilains glissements de vernis sous le guide.
¤ Tu appliques une - bonne - couche de Malt Teaser.
¤ Tu retires rapidement (comprendre : ne surtout pas attendre que Malt Teaser soit sec) les bandes à la pince à épiler, avec délicatesse.
¤ Tu patientes. Tranquillement. Encore. Non, non, encore un peu.
¤ Tu uniformises et protèges le tout avec une couche de top coat.
¤ Tu t'auto applaudis.
Simple, non ?
¤ After having applied your base coat, you apply your pretty Honeydew - blank painting of the future nail art - in 2 coats.
¤ Either you apply a speed dry top coat, or you wait wisely - and for a long time - until it is perfectly dry.
¤ You lay out Nail Vinyls, as in the tuto above.
¤ You take care to press firmly on guides, especially in the junction between the nail and the skin/cuticule, to avoid the unpleasant slidings of polish under the guide.
¤ You quickly remove Nail Vinyls with tweezers, with delicacy.
¤ You protect the whole with your top coat.
¤ You congratulate yourself.
Easy, right ?
Parlons maintenant des guides Nail Vinyls, puisque ce sont tout de même bien un peu eux les stars du jour.
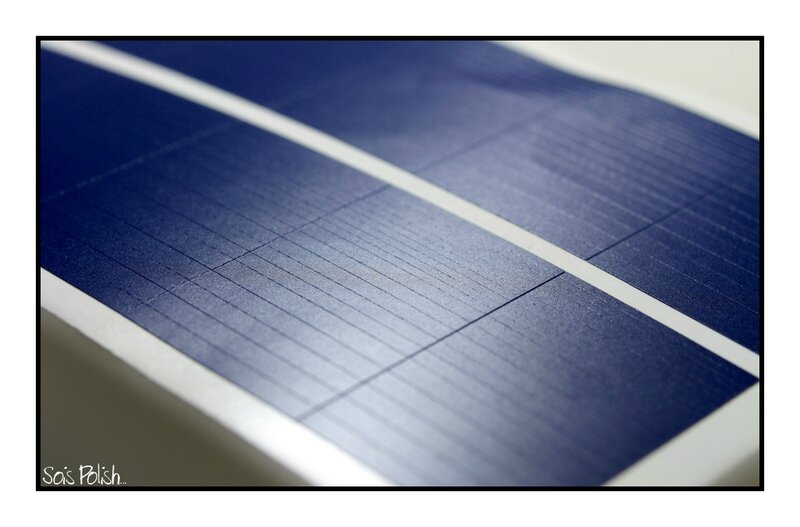
Comme je te l'ai dit en début d'article, la grande nouveauté commercialisée par Picture Polish, c'est un pack de guides de la marque Nail Vinyls, qui se déclinent en 4 motifs différents : chevrons, mini chevrons, lignes droites et angles droits. Derrière cette marque se cache un femme comme toi et moi (ou presque), et vraiment je t'invite à aller jeter un oeil à ce qu'elle propose sur Facebook, Instagram et la boutique en ligne. J'ai d'ailleurs découvert d'autres modèles très sympas (étoile, éclair, half moon,...), qui feront certainement mon bonheur tôt ou tard ;)
Comme tu l'as certainement remarqué, de mon côté j'ai reçu les lignes droites. Sur une même planche, on trouve 200 bandes de 3 largeurs différentes : 50 de 2.5 mm, 50 de 2 mm, et 100 de 1 mm de largeur. De quoi s'amuser un paquet de fois, hein.
Forcément, ça m'a de suite rappelé mon outil fétiche... le striping tape :)
Niveau utilisation, bah, c'est comme pour le strip'... mais avec quelques avantages !
¤ à l'inverse de ce bon vieux striping, ces guides sont prédécoupés... Et ça, ÇA, c'est un gain de temps vraiment, mais alors vraiment appréciable !
¤ 3 largeurs différentes = biiiiiiiien plus de possibilités.
¤ ces guides sont plus épais, plus solides que du strip', tout en étant très maniables, flexibles, ce qui facilite grandement la manipulation.
¤ l'adhérence sur l'ongle est par-faite.
Bref, c'est un sans faute pour moi ! La qualité est au rendez-vous, et on peut obtenir autant de propreté qu'un nail art réalisé au striping tape... sans les possibles inconvénients :)
(mais le striping reste le striping pour moi hein, indétrônable ♥)
Voilà !
Pour terminer, je n'ai qu'une chose à dire : MERCI !
À toi, de me lire régulièrement ou non, ainsi qu'aux filles de Picture Polish, pour leur confiance ♥









/http%3A%2F%2Fstorage.canalblog.com%2F49%2F57%2F1023165%2F108190288_o.jpg)
/http%3A%2F%2Fstorage.canalblog.com%2F65%2F71%2F1023165%2F108091284_o.jpg)
/http%3A%2F%2Fstorage.canalblog.com%2F81%2F26%2F1023165%2F107418966_o.jpg)
/http%3A%2F%2Fstorage.canalblog.com%2F70%2F53%2F1023165%2F107760767_o.jpg)